Epic Threads
Accessorizing with Clays and Metals
by Natasha Condon,

|


Known in the cosplaying world as Jongleur, Tasha is one of the best accessory-makers in fandom. Be it necklaces or headpieces, she can make just about anything. Her previous work can be seen on her website, which also features tutorials and plenty of tips for aspiring cosplayers.
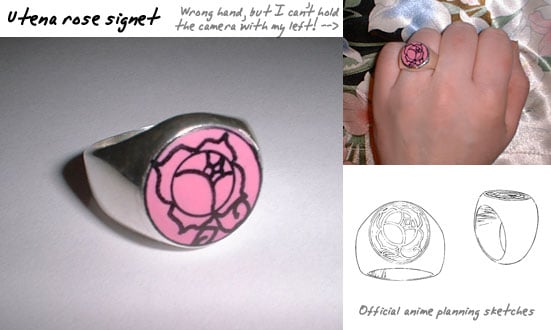
My big confession; I've never actually cosplayed. I only started making cosplay accessories when a friend at Oxford University Animesoc enlisted my help to make an Utena duelist's ring for her Juri outfit. I had so much fun figuring out how it could be done and putting it together that before I knew it, I had a mini-business on my hands, specializing in anime jewelery and accessories, plus a side-line making models. What I've written down here are just a few tips for anyone who's getting started with cosplay accessories, and I hope they come in useful!
Anime artists have one big advantage over the humble cosplayer; they don't actually have to obey the laws of physics. It makes life that much harder when the earrings you want to copy change shape from one moment to the next, or develop detailing that's crystal-clear in the credits sequence, but missing in the episode because they couldn't be bothered to animate it. Sometimes the back view and the front view in two different screenshots don't seem to be related to each other at all… So when you're planning to make something, you can't have too many reference pics to work from.
Obviously, finding references is easier with some anime than others. The makers of Utena, for example, put concept sketches of the duelist's ring in one of their artbooks, so a little time spent searching fan sites got me everything I needed - but when I wanted to make Juri's locket from the same series, I was reduced to watching my DVDs in slow motion to find exactly the close-up I needed. Sometimes you need a bit of imagination - the important thing is not that you have every single detail exactly as the animators intended, but that you know exactly how *you* want it to look before you start.
Also when you're planning, make sure you know what size your accessory will be. Anime accessories are usually a bit bigger in scale than they would be in real life. For example, Kyo's bead bracelet from Fruits Basket looks perfectly normal on his bony anime-thin wrist, but if you actually count the number of beads and measure your human-sized wrist, you'll realize that they're bigger, chunkier beads than you'd normally wear on a bracelet. It makes a surprising amount of difference if you get the scale right – it makes the bracelet look like Kyo's, rather than just something you found and decided to use. If in doubt, make yourself a paper template and hold it up, using your own body as a measure – you want the accessory to look the same size on you as it does on the character you're cosplaying.
As for materials, I'm a huge fan of polymer clay (Fimo, Premo, Sculpey are the common brands), just because you can do so much with it - it's flexible into any shape, but bakes hard, and you can mix exactly the right colour for the job. Even better, it's lightweight, which means that huge dangly, anime-scale earrings won't pull your ears off. The only thing it isn't is strong, so be careful if you're making anything that has to carry weight, as you might need to reinforce it.
Polymer clay can be baked more than once, which is a huge bonus if you're making something complicated. You can make one component, bake it hard, then add a bit more clay and bake again without having to worry about accidentally squishing the lot. (It's not advisable to do this *too* many times as after a while the clay will darken from overcooking, and if you keep going, it will eventually go black and strange, and produce a smell that will get you banned from using the family oven ever, ever again)
As well as baking multiple times, you can work the clay after it's been baked. It's soft enough to cut with a sharp knife, and you don't need a drill to make holes in it – you can twist the drill bit through with your fingers. This really saved my life when I made Garnet's pendant from Final Fantasy IX, where I made all the components of the fiddly "crown" design individually and then glued them together - some were baked on in layers, some were baked separately, and some were carved out of baked clay with a knife.
I also like working with metal - you can get very thin brass or aluminum sheet, which is easy to work with and cut with scissors (watch your fingers, though, you get sharp edges this way), from a hardware or craft shop. Real metal always looks so much better than something else painted silver or gold. I try to avoid wood unless the item I'm making is actually supposed to be made of wood - it's such a pain to do all that sanding.
Another big tip is to search your local flea market for useful materials that can save you a ton of work. A cheap silver-coloured signet ring is perfect for an Utena duelist's ring - bash the signet part out with a screwdriver and replace with pink polymer clay, draw the design on with a black CD marker pen, and that's all you need. Glass blobs intended to decorate pot plants or floating candles make beautiful coloured "gems," and if you need particular shapes, then cheap teen jewelery shops are great for pink plastic hearts or "diamonds." Fabric scraps or curtain tassels from a haberdasher's can be converted into ribbon for a choker or decoration for a Chinese priest's prayer beads.
For more weird and wonderful things, a bit of lateral thinking may be required. The huge octagonal crystal on Garnet's pendant is a sun-catcher window decoration I found on Ebay. The translucent "wings" on Princess Tutu's pendant are a scrap of an old net curtain, glued onto a bit of clear plastic packaging to make it rigid, and cut out into the right shape.
Finally, online jewelery suppliers are a cheap way of getting quality beads and findings such as necklace clasps, badge backs, and beading wire. My favourite is Fire Mountain Gems for their sheer variety of choice, and they also have some useful tutorials on simple jewelery craft. A lot of making cosplay accessories is basically jewelery-making; the added bonus is that this will also impress the hell out of your grandma, when she realizes that you can fix all her old broken necklaces with nothing more than a bit of wire and some pliers.
That's pretty much it for tips – there is a selection of tutorials for particular cosplay items up on my site, and if the one you want isn't there, I'm always glad to give advice to those who need it! The golden rule is; the weirder the item, the more fun it is to make, and the more likely you are to stab yourself with a craft implement while making it. But at least you get the great satisfaction of knowing you made your perfect accessory with your own fair hands.
Tutorials:
discuss this in the forum (9 posts) |
this article has been modified since it was originally posted; see change history